Nearly 80 percent of all holiday strand failures stem from a single, intentional engineering choice: a micro-fuse tucked inside the male electrical plug. Every year, millions of Americans throw away functional string lights, assuming a dead section means a ruined display. In reality, that tiny glass tube is a sacrificial guard designed to prevent electrical fires, and replacing fuse in Christmas light plug assemblies takes less than two minutes with basic household tools.
Understanding how to service these ubiquitous holiday displays saves money, cuts down on electronic waste, and keeps home seasonal decorations safe.
The Hidden Safety Physics Inside Your Holiday Plug
Holiday lights operate under rigorous home electrical safety standards. According to safety evaluations by organizations like Underwriters Laboratories (UL Solutions), mini-light strands draw current through thin-gauge copper wiring that can quickly overheat if overloaded.
To prevent insulation melt-downs and arc fires, manufacturers install miniature cartridge fuses inside the plug housing.
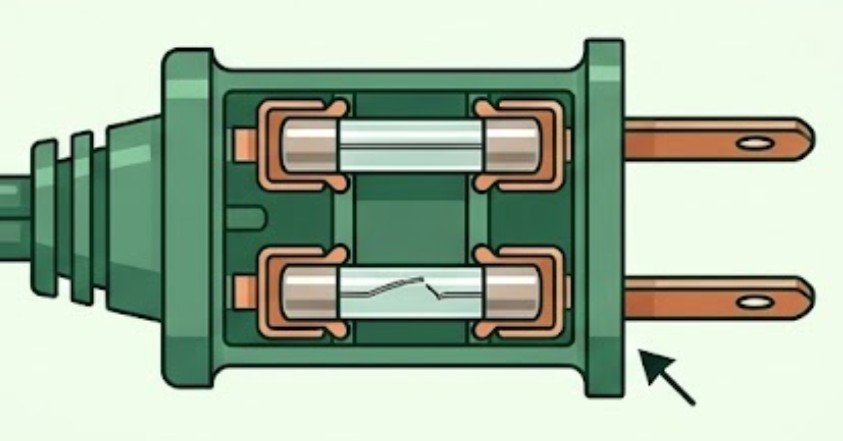
Male Plug Anatomy
A typical male plug consists of two electrical prongs connected to internal wiring through a fuse-protection system. The key components include:
- Prongs: The metal contacts that connect the plug to an electrical outlet.
- Slidable Fuse Door: A removable or sliding section that provides access to the internal fuses.
- Fuses: One or more fuses positioned behind the fuse door to protect the electrical circuit from excessive current.
- Wire Leads: Internal conductors that carry electrical current from the plug toward the connected device.
Basic arrangement:
[Prong] → [Slidable Fuse Door with Fuses] → [Prong]
** ↓**
** [Wire Leads]**
When too many strands are connected end-to-end, the total amperage exceeds the wire’s rated capacity. The internal filament inside the tiny fuse melts instantly, breaking the circuit before the wire itself can ignite. It is an elegant, cheap safety net—provided you know how to reset it.
Essential Gear Before You Begin
Before opening the plug, gather a few basic items:
- Replacement Fuses: Standard incandescent mini-lights typically use 3-amp (3A) fuses, while heavy-duty or commercial LED strands may require 5-amp (5A) variants.
- Precision Tool: A miniature flathead screwdriver (like an eyeglass screwdriver), a fingernail file, or a blunt pocket knife.
- Magnifying Glass or Smartphone Camera: Handy for inspecting the ultra-thin glass tube.
- Work Surface: A clear, well-lit table so tiny components do not bounce onto the carpet and vanish.
Crucial Safety Note: Never bypass a blown fuse by wrapping it in aluminum foil or using a higher-amperage fuse than the manufacturer specifies. Doing so turns your light strand into an un-fused fire hazard.
Step-by-Step Guide to Replacing Fuse in Christmas Light Plug Units
1.Disconnect Power Completely:Mandatory safety step.
Unplug the light strand from the wall outlet or extension cord. Never attempt to service any electrical component while energized.
2.Locate and Open the Slide Access Door:
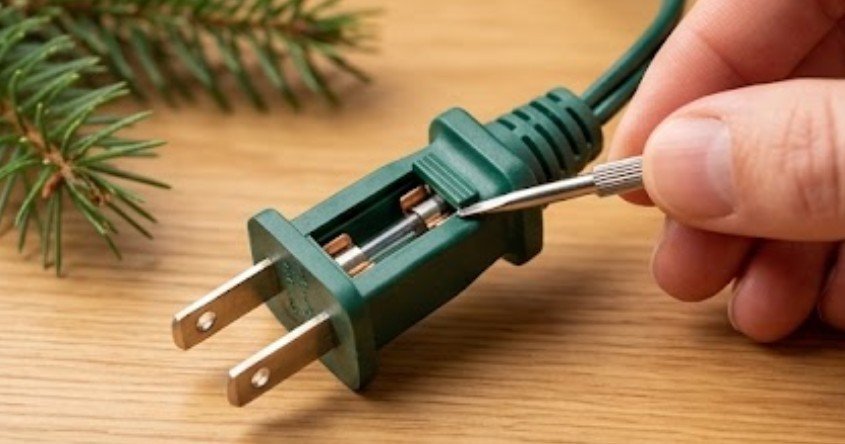
Examine the male plug (the end with the metal prongs). Look for a small plastic panel on the side or face of the plug, usually marked with a small arrow or the word “OPEN.” Insert the edge of your flathead screwdriver or fingernail into the slide groove and push the door open toward the metal prongs.
3.Inspect and Extract the Miniature Fuses:
Inside the compartment, you will see one or two tiny glass cylinder fuses held by metal spring clips. Gently leverage the tip of your precision tool beneath the metal end-cap of each fuse to pop it free.
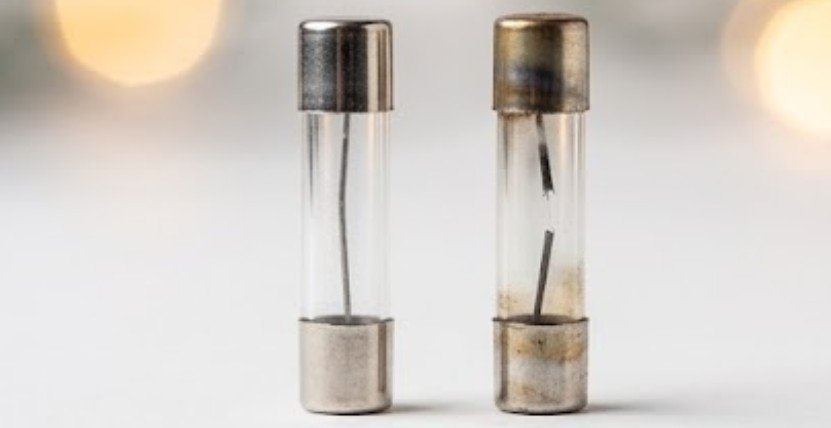
Hold the fuse up to a bright light:
- Good Fuse: A clear glass tube with an intact, unbroken wire running end-to-end.
- Blown Fuse: A broken wire inside, or visible black/silver charring on the glass.
4.Snap the New Fuses into Place:
Align the replacement fuse over the metal contact channel. Press down evenly on both ends with your thumb until it snaps firmly into the spring clips. If your plug holds two fuses, it is best practice to replace both simultaneously.
5.Seal and Test the Strand:
Slide the plastic access door shut until it clicks flush against the plug housing. Plug the strand directly into a wall outlet to verify that illumination is restored.
Troubleshooting: Incandescent vs. LED Strand Mechanics
Diagnosing lighting failures requires knowing which technology powers your display. The electrical behavior differs significantly between traditional incandescent bulbs and modern light-emitting diodes (LEDs).
| Feature | Traditional Incandescent Strands | Modern LED Strands |
| Typical Fuse Amperage | 3 Amp (3A) | 3 Amp or 5 Amp |
| Max End-to-End Connections | 3 to 5 strands maximum | Up to 25 to 30 strands |
| Common Failure Cause | Overloaded wattage / Shunt failure | Corrosion / Damaged power supply |
| Individual Voltage Draw | 2.5V to 3.5V per bulb | 12V to 24V array segments |
| Power Consumption | ~40–50 Watts per 100 bulbs | ~4–8 Watts per 100 bulbs |
The National Fire Protection Association (NFPA) reports that seasonal electrical distribution equipment accounts for thousands of home fires annually. Skipping LED fixature mistakes drastically lower this risk due to their minimal current draw, but their internal fuses remain vital protection points against short circuits caused by pinched wires or water ingress.
When the Fuse Isn’t the Problem
If replacing fuse in Christmas light plug assemblies does not fix the dark strand, work through this diagnostic sequence:
- Check for a Missing or Loose Master Bulb: On series-wired strands, a single unseated bulb can break the circuit.
- Inspect for Corroded Socket Contacts: Outdoor displays exposed to rain often develop copper oxide rust inside individual sockets.
- Scan for Pinched Wires: Sharp staples or tight outdoor hooks can cut through wire insulation, creating an open fault that bypasses the plug entirely.
- Test the Outlet: Confirm that your wall GFCI (Ground Fault Circuit Interrupter) outlet hasn’t tripped.
For complex outdoor setups or persistent circuit issues, reviewing general home wiring principles from the U.S. Consumer Product Safety Commission (CPSC) can help identify broader electrical hazards.
Frequently Asked Questions
1. Where do I find spare fuses for my light strand?
Most new light sets include a small plastic bag with two spare bulbs and 1–2 replacement fuses taped near the male plug. You can also buy standard 3A or 5A mini-fuses at hardware stores.
2. Why do my Christmas light fuses keep blowing immediately?
Instant failures mean an active short circuit or excessive load. Ensure you haven’t daisy-chained too many strands together, and check the wire insulation for bare spots, crushed sections, or moisture inside sockets.
3. Can I use a 5-amp fuse instead of a 3-amp fuse?
No. Always match the exact amperage printed on the plug. Installing a higher-amp fuse lets dangerous levels of current pass through, defeating the safety mechanism and increasing fire risk.
Keeping Your Holiday Bright and Safe
Preventing blown fuses comes down to simple electrical arithmetic. By checking total wattage before linking strands end-to-end and replacing tired fuses with exact manufacturer-rated spares, hide Christmas light cords, you extend the life of your holiday investments while keeping your home secure